ұҫМыЧоәуУЙ tinker326 УЪ 2014-10-21 14:41 ұајӯ
ХвТіУРРн¶аВ©өДөШ·ҪЈ¬ұИИзlk mp hkЦ®АаөДЈ¬НнЙПУРКұјдОТІ№И«Ј¬»№УР360ЦёБо
LoNG RANGEAs Zangief doesnЎҜt have many moves that reach an opponent from long range, your main goal from this distance is to be patient while working his way forward. ZangiefЎҜs only long-reaching attack, his Flying Power Bomb (g + K), is easy to react to at long range with a jump-in combo. Be sparing with this attack if you use it at all. Because you want to be close to your opponent, from long range, you should try to move in and see how your opponent reacts. If your opponent moves back with you, attempting to keep a stable long-range distance from Zangief, you should attempt to walk them to the corner; if your opponent gives up on this, youЎҜll end up in a mid-range footsie fight before you can actually get close to your opponent. An opponent that has a projectile will certainly attempt to use it to control the space between them and Zangief. When a projectile is approaching, you can use a Double Lariat (PPP) or a Quick Double Lariat (KKK) to have it pass straight through you. Quick Double Lariat is faster, allowing you to react to an opponentЎҜs follow-up more quickly; however, it can be countered by a projectile during the startup so it must be used early. You are able to slightly maneuver around during a Lariat, allowing you to position yourself further forward or backward as needed. Banishing Flat (e + P) can be used to move Zangief forward and nullify a projectile if you are accurate; however, it is often hard to actually hit the projectile and not just wind up getting counter hit. It is also a rather sluggish attack so an opponent can attempt to bait it and whiff punish your Banishing Flat attempt.
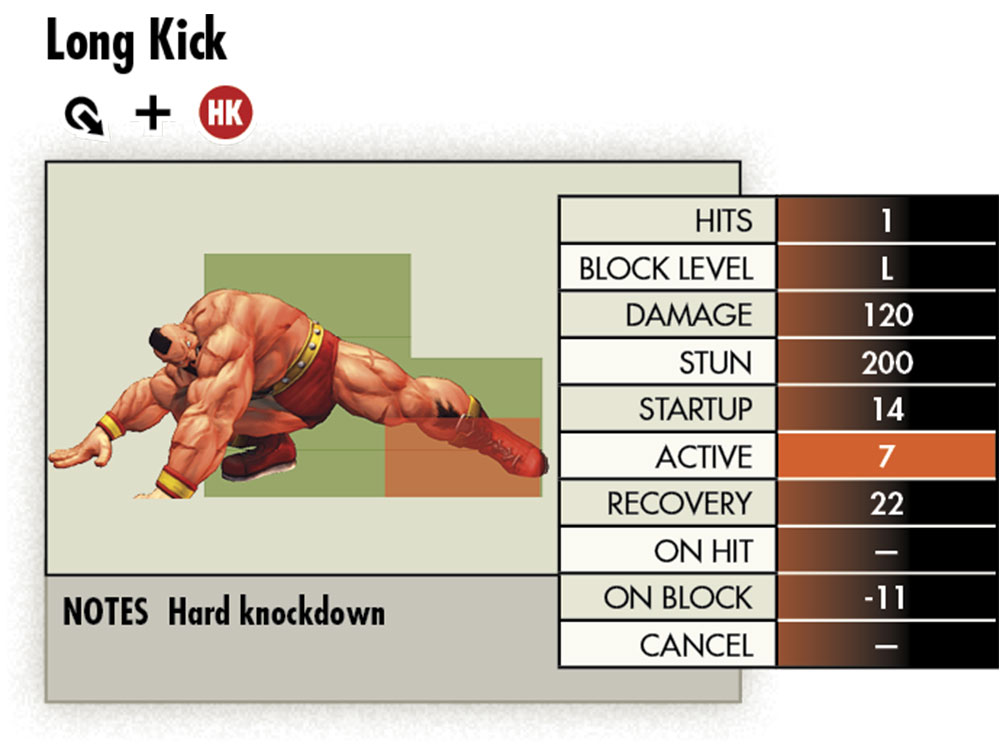
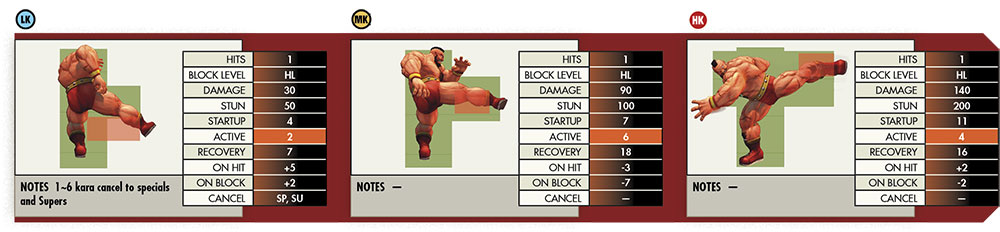
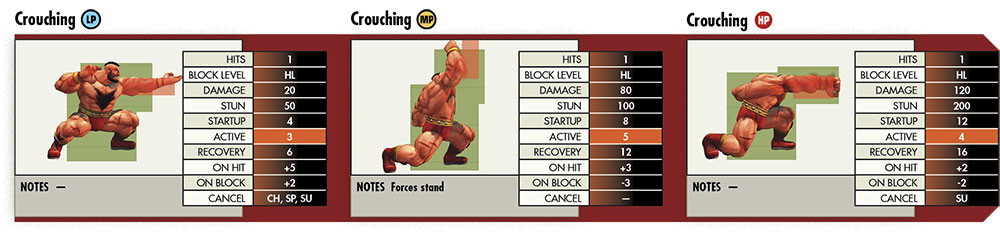
MID-RANGEYour strategy in mid-range is to play a solid ground game to either work your way in or frustrate an opponent into opening themselves up by whiffing an attack or jumping at you. You can do this by playing slow and not overcommitting to any one course of action. Dance in and just out of the maximum range of your opponentЎҜs pokes and look to see how your opponent reacts. If they try to move in, you can put a stop to their advancement with a standing m or perhaps chained l. If your opponent is content to fight at this range, attempt to out-space their favored pokes and whiff punish when possible. If an opponent tries to back up, advance upon them to both slowly push them toward the corner and keep in a mid-range fight. Your most useful poke in mid-range is your standing m; it is a fast and far-reaching poke that has enough frame advantage to be used as a combo starter if you are close enough. From start to recovery standing m is only 15 frames long, making it impossible to whiff punish on reaction. Your opponent can space it out and have it whiff, but unless you are predictable, it will be hard for your opponent to stop you from employing standing m. On hit, you can link standing L or l and cancel to LP or EX Banishing Flat. Since standing m pushes you out a bit and standing L doesnЎҜt have the furthest range, you can also attempt to use standing l as your combo starter; it will combo into standing L from slightly farther away than standing m. ItЎҜs also chain-cancelable, allowing you to confirm off of 2 standing jabs before linking a L if you are close enough. Standing L is also useful on its own in this range as a whiff punish with L > EX Banishing Flat. If you have a full Super Gauge, you can go into Combo VII for strong damage. Without meter, you can use LP Banishing Flat and be mostly safe at -2 on hit, thanks to the increased hitstun allotted to the move in USFIV. If your opponent is trying to keep enough space to avoid your standing m and standing L, you can potentially catch them walking with a Long Kick (4 + H), which scores a knockdown and a chance to get in on them. Otherwise, you can take a risk and attempt to surprise your opposition by whiffing a LP Banishing Flat, standing H, or crouching M, and then immediately going for LP Spinning Piledriver as you recover. Note that all of these moves can be whiff punished if your opponent is looking for them. From mid-range, your opponent takes a much greater risk relying on projectiles
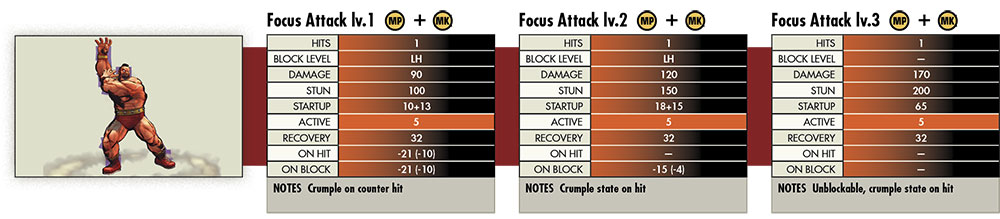
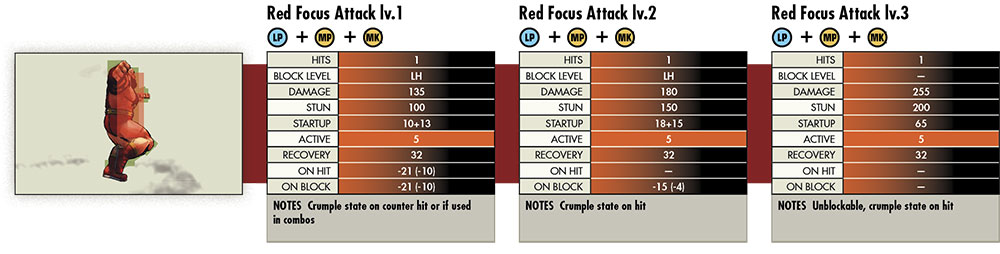
against Zangief then they do from afar. If you have 1 bar to spare, EX Banishing Flat
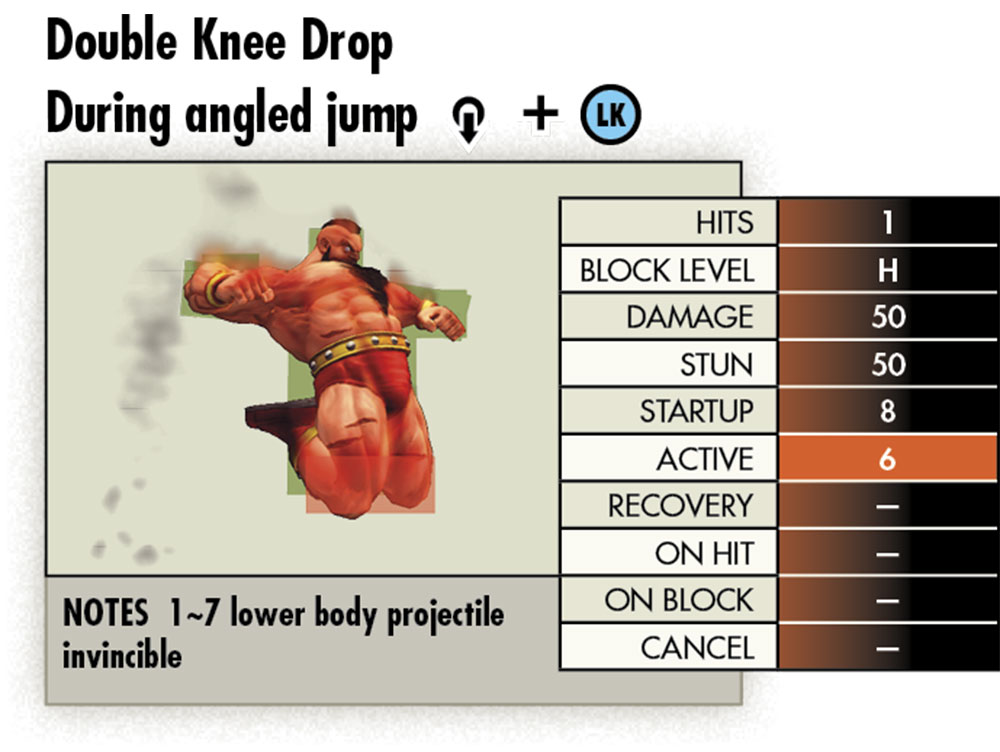
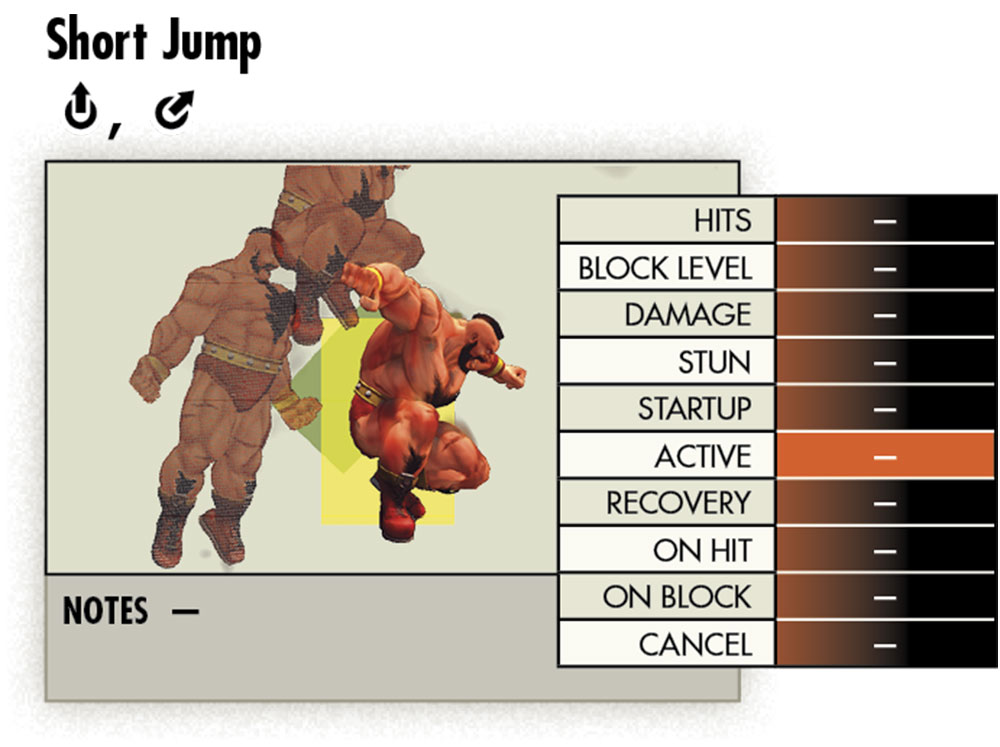
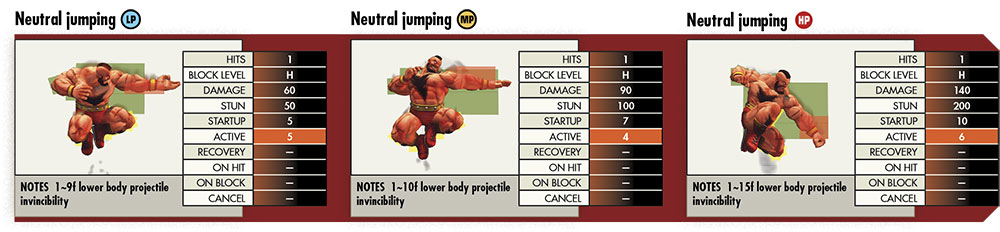
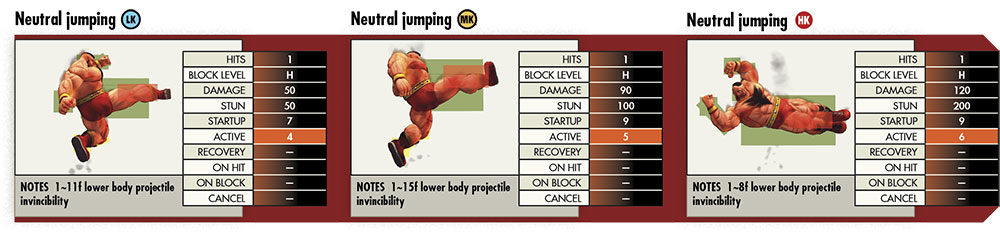
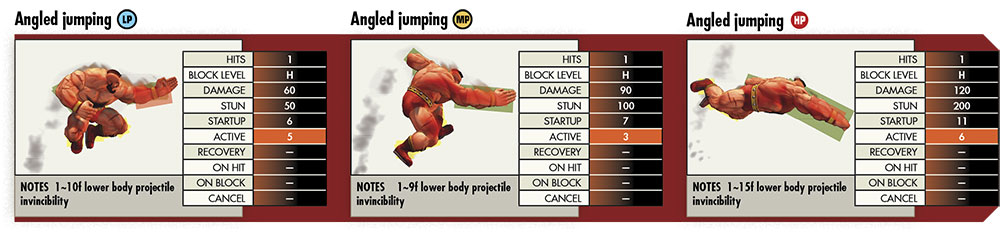
(e + PP) will easily pass through a projectile on reaction, getting you some damage and positioning Zangief on top of your opponent with advantage. With a full Super Gauge, you can cancel EX Banishing Flat into a lv.1 EX Red Focus Attack and then follow-up with either an Ultra Combo or an Atomic Suplex. Normal versions of Banishing Flat wonЎҜt work well as a projectile counter at this range. Double Lariat can be used sparingly, though it will oftentimes lead to Zangief being whiff punished from mid-range; Quick Double Lariat is faster on recovery, but you must be fast if you want to use it on reaction to a projectile since you can be hit during the startup frames. If your opponent is heavily preoccupied in controlling you on the ground, you can attempt to bypass this space by jumping at your opponent. Zangief has several attacks with high priority from his jump; diagonal jumping h reaches the farthest forward of all of your jumping attacks and, because it is a heavy attack, it puts your opponent in enough hitstun to guarantee a blockstring after you reach the ground. If your opponent blocks a jump-in h, they will be in range of a LP Spinning Piledriver, Super, or Ultra I as they recover. Jumping H can be used in much the same manner. Diagonal jumpingM is ZangiefЎҜs deepest jump-in, making it useful against characters that generally try to use normal moves for anti-airs. It does not quite have the same horizontal reach as jumping h, so youЎҜll need to be slightly closer. You can attack with diagonal jumping M earlier in ZangiefЎҜs jump arc than with other jump-ins, which may catch the enemy by surprise; for example, kicking them in the head during the 3 portion of a 3 5 4 dragon punch motion. Zangief has the ability to alter his jump trajectory slightly; you can use a short jump by tapping1~2, which reduces the range of your jump. This works well in conjunction with Knee Drop (5+ L), since Knee Drop reduces your hurtbox, allowing you to bait some anti-air attacks and then punish your opponent on the ground, or simply to whiff a jumping attack and immediately use a LP Spinning Piledriver upon landing. Likewise, your opponent may come to that same conclusion and attempt to jump on you. Zangief has one of the strongest anti-air attacks in the game with his Double Lariat; as it requires no joystick motion at all, it is very easy to use as a twitch reaction to a jump you were not expecting. WhatЎҜs even better is you can use this attack from a crouching position, making yourself slightly less likely to be hit when you are attempting to use it as late as possible. As heЎҜs attacking in both directions, Double Lariat even works well against cross-ups. If your opponent is either jumping in from a bit away or neutral jumping from outside the range of your Double Lariat, you can hit them with either standing H or an EX Banishing Flat; both attacks are rather slow, so youЎҜll have to activate them early. Standing H does high damage for a normal move and it hits high up on the opponentЎҜs body while moving Zangief forward. ItЎҜs basically a dash with an anti-air/anti-standing spike on the front of it, and thatЎҜs how you should use it. EX Banishing Flat is invincible until active and knocks down an airborne opponent on hit, allowing you to start close-range mix-ups on your downed opponent. Jumping backward with h can work well as anti-air also, but you give up ground when using it. Neutral jumping M hits above and in front of Zangief, making it valuable against characters with jumps that float like Guy or M. Bison. Against characters that change their jump arcs with dive kicks, if you donЎҜt want to commit to a Double Lariat when theyЎҜre jumping in from far off, you can simply use standing l safely without extending your hurtbox forward.
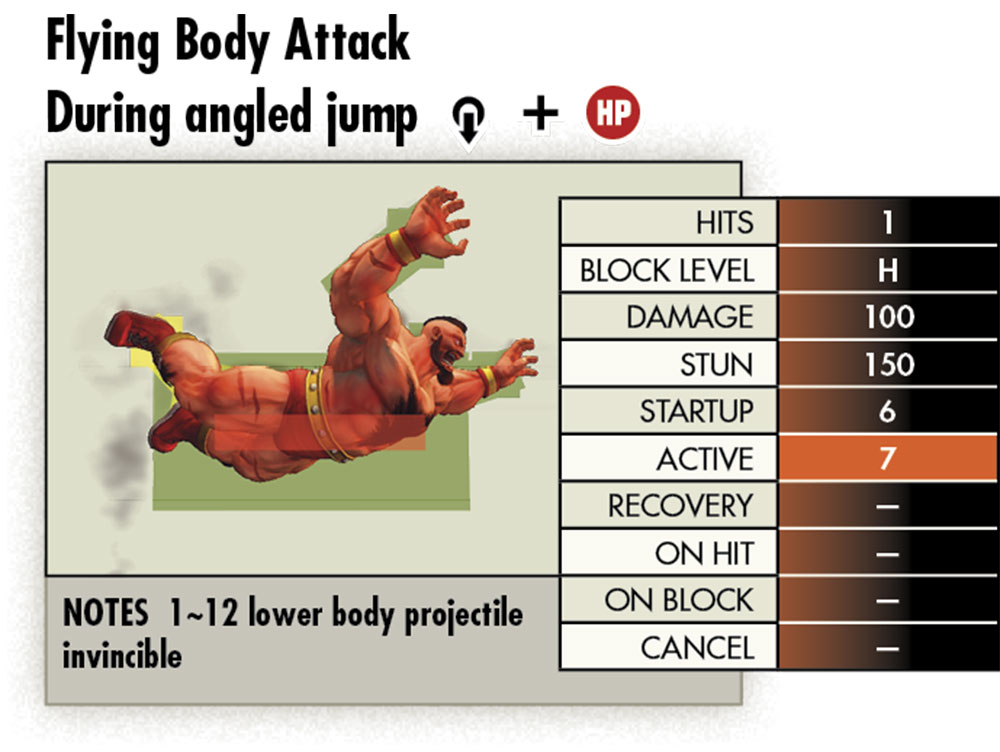
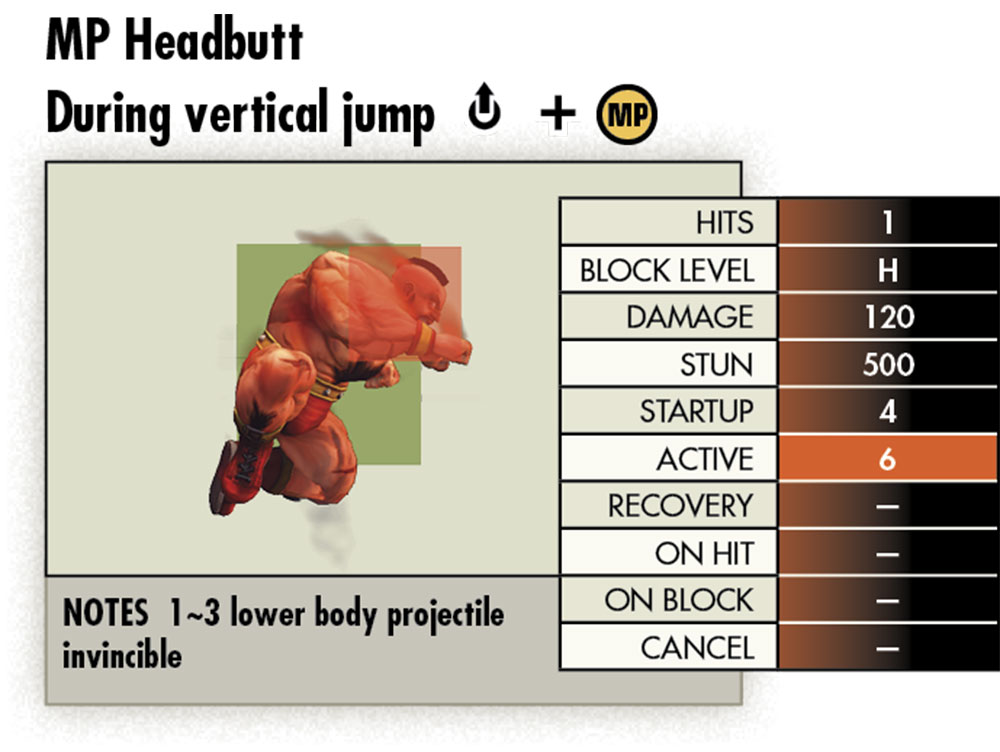
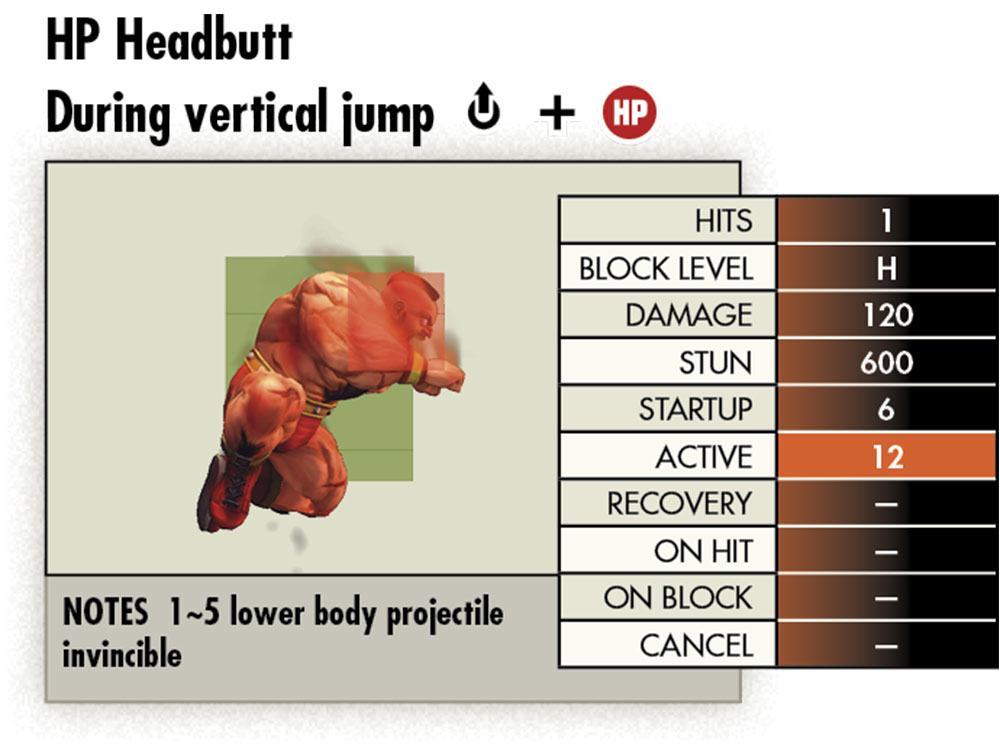
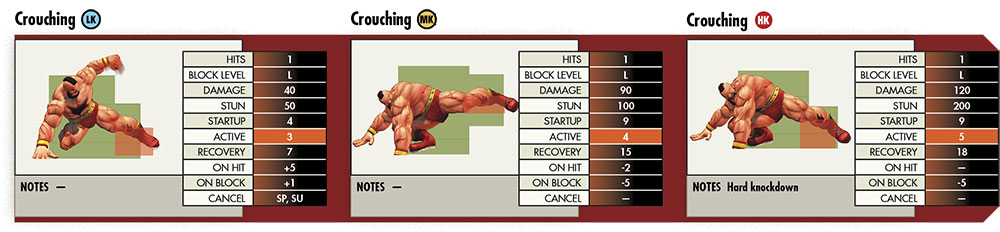
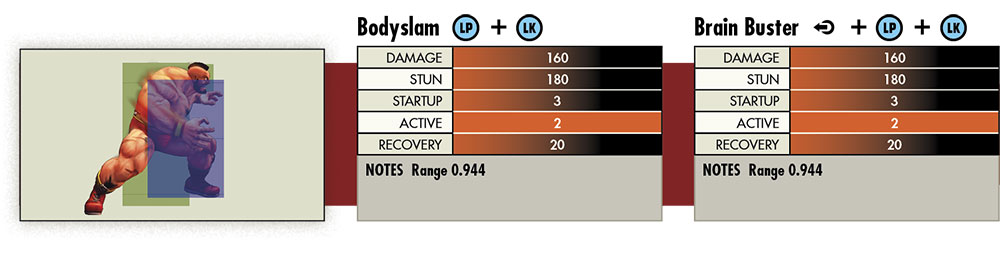
CLOSE RANGEZangief is at his strongest when he is next to his opponent and on the offensive; at close range, his goal is to keep the enemy from jumping away from him with good use of his close and crouching normal moves. Once you have intimidated your opponent into blocking your attacks, you will leave them open to ZangiefЎҜs category-defining command grabs. When up close, your opponent will more than likely try to escape from your command throws; they are likely to try to either jump away or backdash. ZangiefЎҜs primary tool for pressuring his opponent in this situation is crouching L. Crouching L is a fairly quick poke thatЎҜs active on the 4th frame with advantage on hit and block. You can use it to hit confirm into either Combo I or II, depending on how comfortable you are linking multiple crouching L kicks together. If youЎҜre pretty sure of your opponentЎҜs patterns, you can go for a higher damage option and try landing a close M; with the increase in hitstun it received in USFIV, you can now use it for a high-damage punish as in Combo V. If you think your opponent isnЎҜt likely to try to jump away from you, it is reasonably safe to attempt a command throw. While pressuring an opponent with crouching L, you can attempt a tick throw with LP Spinning Piledriver after up to 3 kicks. After successfully landing a Spinning Piledriver, you recover far from your prone opponent; whiffing LP Banishing Flat will move you toward your downed foe with enough time to set up a meaty attack or go for another command throw. If you are close to your opponent, you can attempt an Atomic Suplex rather than a Spinning Piledriver. Atomic Suplex has a greatly diminished range but is equally as fast; on hit, you end up with a far stronger offensive setup. After landing Atomic Suplex, you can: use jump and cross-up with a Flying Body Attack and then have guaranteed pressure against your opponent on the ground; use a short jump Flying Body Attack for a frontal hit; use a Double Knee Drop from either jump to force your opponent to deal with different command grab timing on landing, thanks to Knee DropЎҜs short hitstun; or simply do an empty jump then land and attack with another command throw, or crouching L to catch your opponentЎҜs attempt to block standing or jump away. Backdashes can easily allow an opponent to escape close-range offense if you arenЎҜt wary. Zangief can option select backdashes by most characters with crouching H between two chain-canceled crouchingl punches; Long Kick is too slow to serve this purpose, so make certain you arenЎҜt holding 4during this option select. Characters with excellent backdashes like Chun-Li, Ibuki, and Rose move too far and too fast to be punished in this way. If you make a read of your opponent attempting to backdash, you can punish it harder with MP or HP Banishing Flat or a raw Ultra II done low to the ground while holding forward after activation. Once youЎҜve managed to push an opponent all the way to the corner, you will have a supreme offensive advantage; just keep in mind that no matter who youЎҜre fighting, your opponent will be scared at this point and will try to escape. Once your opponent can no longer use their mid-screen walking speed to make your attacks whiff, their options will be reduced to trying to counter poke, reversal, block, or more likely jump (either vertically or over you, out of the corner). Similar to when youЎҜre close to an opponent at mid-screen, your goal is to make them too scared to jump away. Staggered l strings will facilitate this well, as will standing m. An opponent who has taken almost any damage at all can easily be stunned when attempting to escape the corner by countering with an anti-air HP Headbutt. When Zangief is on the defensive, he has limited but useful options. As ZangiefЎҜs strike-invincible special moves are all still susceptible to throws, you will have to choose between defending yourself from throws or strikes. Backdash generally makes for a poor defensive option, as Zangief has one of the worst backdashes in the game; it is slow enough to be punished on reaction and travels essentially nowhere. Without spending meter, your options are more limited; Double Lariat and Quick Double Lariat both have limited invincibility, so youЎҜll have to decide in advance whether you want to try to beat a high or a low attack. Spinning Piledriver is active on the 2nd frame, allowing it to beat any strike thatЎҜs not meaty as well as punishing an opponent for just blocking. A Spinning Piledriver used defensively is more likely to be useful when done to interrupt an opponentЎҜs pressure string rather than on wakeup. As throws cannot trade with strikes, if your opponent leaves a gap at least 1-frame wide when you attempt to reversal with a Spinning Piledriver, then they will get grabbed if they are grounded and within range. EX Spinning Piledriver is active on the 4th frame; it is invincible to strikes and can be used to grab an opponent attempting a safe jump attack. Ultra I can make for an excellent reversal, being both fast as well as completely invincible; however, you should use this with caution, as you are unlikely to get a second chance at landing an Ultra, and if you miss, you will certainly be punished. | 


 ·ўұнУЪ 2014-10-21 01:53:20


 КХІШ
КХІШ ОўРЕ
ОўРЕ
 ВҘЦч
ВҘЦч